RAW files - the photographers friend
I have been using raw files in my photography for about 4 years now, I remember
when I bought my first DSLR camera, one of the first tips I came across was to
take all photos in RAW.
I have lost count now on how many times the simple switch to RAW has saved me both in personal work and paid work.
RAW files are bigger therefore contain a lot more data, this data is usually lurking in the shadows (by being under exposed) or pushed out by the light (over exposed), they are in effect, a digital negative.
By using multiple exposures with Photoshop, you can create some stunning landscape images that otherwise would have areas of the foreground lost or skies blown out.
With more data to play with and by using a 18% Grey card we can take the image and balance its colours more evenly as 18% Grey is viewed as the centre of the black/white spectrum.
The examples below show how by using the shot with the grey card I was able to give the colour in the photo a more accurate representation.
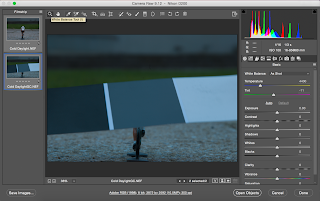
Photo 1 shows the original image, it was taken originally with a blue hue, but because RAW files are bigger and hold more info I was able to use the white balance tool (highlighted) to correct it.
Photo 2 shows a correctly white balanced image obtained by using the Grey card.

I have lost count now on how many times the simple switch to RAW has saved me both in personal work and paid work.
RAW files are bigger therefore contain a lot more data, this data is usually lurking in the shadows (by being under exposed) or pushed out by the light (over exposed), they are in effect, a digital negative.
By using multiple exposures with Photoshop, you can create some stunning landscape images that otherwise would have areas of the foreground lost or skies blown out.
With more data to play with and by using a 18% Grey card we can take the image and balance its colours more evenly as 18% Grey is viewed as the centre of the black/white spectrum.
The examples below show how by using the shot with the grey card I was able to give the colour in the photo a more accurate representation.
Photo 1 shows the original image, it was taken originally with a blue hue, but because RAW files are bigger and hold more info I was able to use the white balance tool (highlighted) to correct it.
Photo 2 shows a correctly white balanced image obtained by using the Grey card.


Comments
Post a Comment